Categories
Crafts Tutorials

Use Evernote to create a searchable inventory of sewing patterns

I recently finished my 3rd runDisney race, and only have a few months until my next one.  I enjoy creating costumes for the events, but seem to go out and buy new patterns each time I need something new (this goes for Star Wars costuming as well, which I also do). While I was looking through patterns online the other day, I realized I probably already own some patterns that would fulfill the needs of at least part of my current/future projects.  I’ve been sewing since 7th grade and have accumulated numerous patterns over the years – of course styles come and go, but when you are mixing patterns sometimes you can utilize a neckline of this pattern or an a-line silhouette of that pattern.  Unless you can catch a sale, patterns can really be expensive, so I decided I should check my stash before running out and buying more… but it’s hard to do with so many patterns (especially if you store them in multiple locations). I recently cataloged all our DVD movies using a phone app and wondered if a similar app exists for patterns.  I didn’t find anything specifically for patterns. There are some general “inventory” apps (I am trying one out for all my embossing folders), but since some of my  patterns are really old I knew I couldn’t rely on the UPC symbol.  So I turned to my old friend, Evernote!
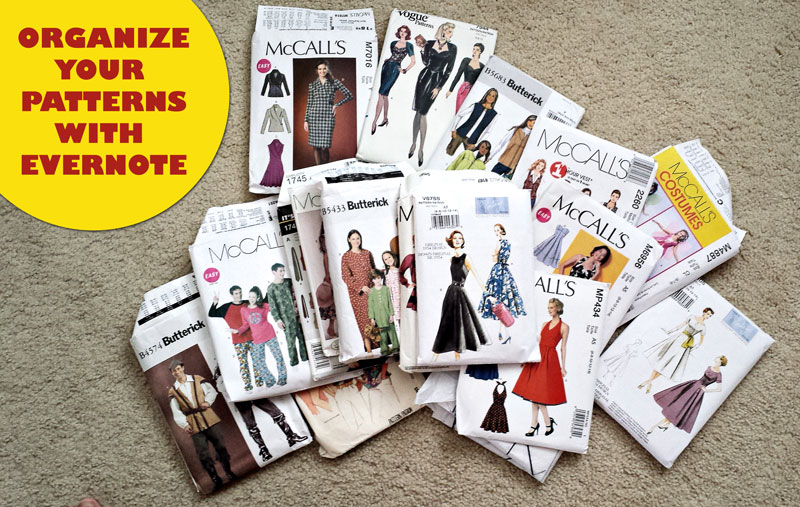
Organize your sewing patterns with Evernote!


I made use of my ScanSnap iX500, which you can pick up on Amazon here: Fujitsu ScanSnap iX500 Scanner for PC and Mac (PA03656-B005)  I bought it to try to organize/get rid of some of my mounds of paper.  While I’m slowly chipping away on the mounds (baby steps!), it does scan very quickly and easily.  The hard part is getting organized before scanning – once that is done, scanning is a breeze.

You could also take photos of all of your envelopes (or maybe find images of them on the internet), but the ScanSnap does the job really quickly, so my intention today is to show you how I used it to catalog my patterns.


ScanSnap Manager settings

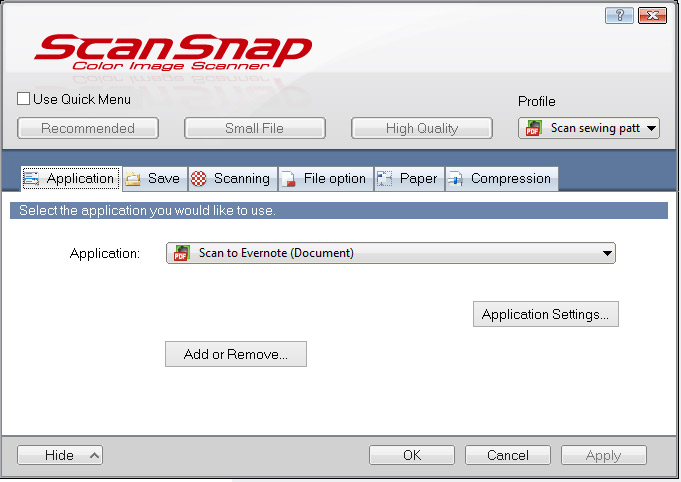
I opened up ScanSnap Manager and created a new “Profile”.  I just called it “Scan sewing patterns”.  On the “Applications” tab, I selected “Scan to Evernote (Document)”
scansnap-a


On the “Save” tab, I left the default in the Image saving folder field, but I suppose I could have added another folder to organize a little better. But my goal is Evernote and not so much my hard drive.  I checked the “Rename file after scanning” box.  This way it gives me an option to change the name before it saves it.

scansnap-b


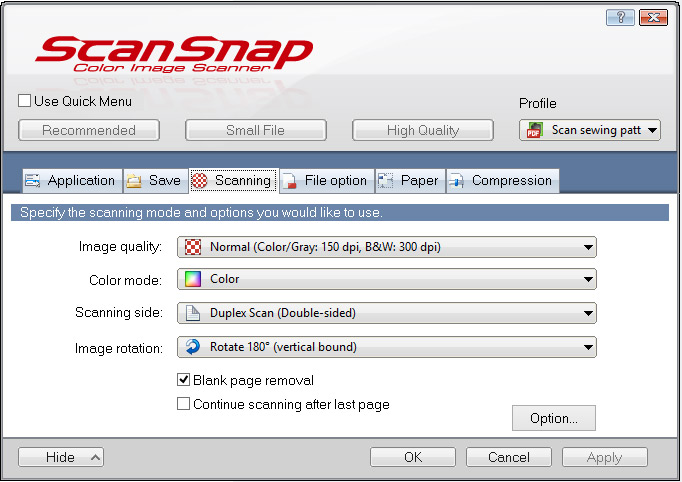
On the “Scanning” tab, I changed the “Scanning side” to “Duplex Scan (Double-sided)” so that it would scan both sides of the envelopes.  I also changed “Image rotation” to “Rotate 180 (vertical bound)” – it’s not essential to change this setting – just personal choice based on how I wanted the envelope to go through the scanner.  I was thinking face down (but right side up) would create the least heartburn.  I don’t think “Blank page removal” comes into play for this single page scan.
scansnap-c


If you click on “Option…”, you’ll see this dialog box.  I didn’t change any of the settings, but good to know they can be adjusted if needed.

scansnap-d


On the “File option” tab, I made sure “PDF (*.pdf)” was selected.  I also made sure “Convert to Searchable PDF” was checked

scansnap-e


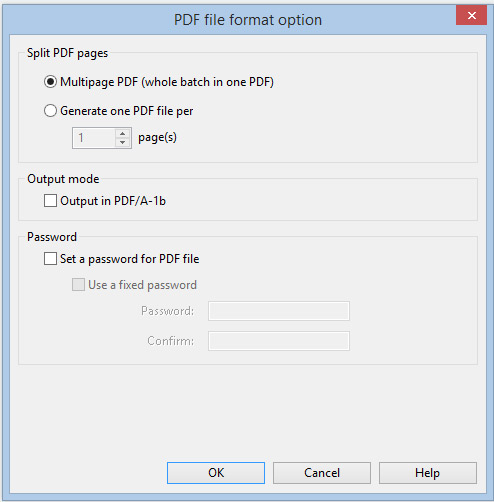
If you click the “Option…” button, you’ll see this dialog box.  I selected the “Multipage PDF (whole batch in one PDF)”.  You could select the other option and use 2 pages and it would yield the same result.  If you generate a PDF for each 1 page, then you can later select the scans from the front and back of the envelope and merge them to one note.  I like the way the merged note looks on my laptop, however I don’t like the way PDFs look on my smart phone (they are attachments that I have to open with a separate app).  If you ‘merge’ documents, you have 2 PDF attachments… one for the front of the envelope and one for the back.  It’s bad enough I have to open one at all – I don’t want to have to open two. 😉
scansnap-f


On the “Paper” tab, I changed the “Multifeed Detection” to “None”
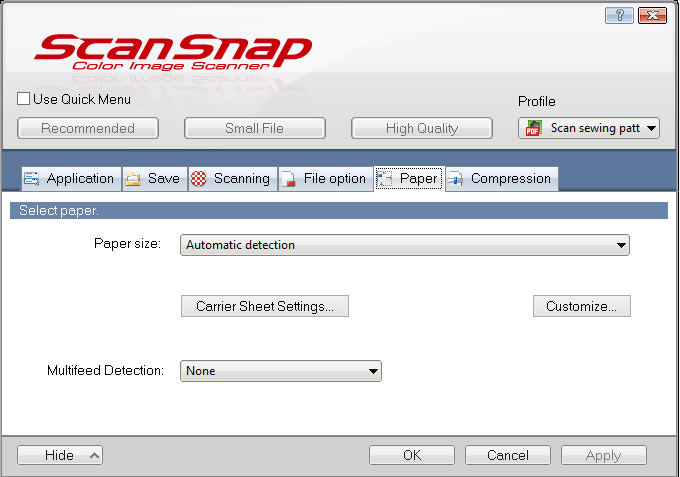
scansnap-g


…. otherwise I would get this error:

scansnap-post1


I already had the value on the “Compression” tab set to 4, so I left it.  It is not a setting I have researched too much yet

scansnap-h


In Evernote, you can either set up your tags before you scan, or do it while you are scanning.  I ended up adding tags while I was scanning, but it’s good to have an overall plan for organization.  But if you don’t (or change your plan later) it’s super easy to move tags around.  Here is what my tags looked like when I was all finished (this was after I did lots of fine tuning). I think it will work for me for now.

Because I’ve gotten in the habit of starting all scanned items with a period, I created a “.sewing pattern” category and a few main subcategories:

  • .pattern categories
  • .pattern company
  • .pattern cut status
  • .pattern difficulty
  • .sewing theme
  • .style

Evernote pattern tags

We are now ready to start scanning. First I removed the contents from the pattern envelope (this is one of the patterns I bought for Disneyland’s 60th anniversary… but I ended up using a different pattern, lol).  It would be too bulky to send the whole thing through the scanner.

20150909_123442

I then loaded the envelope into the scanner as such (this is where the “Image Rotation” on the “Scanning” tab comes into play. If you want to run it through differently then you may not need to change the orientation).

20150909_123611

After pressing the scan button, I was prompted for a new name. I saved the file as the pattern number.  in this case, “MP434”

scansnap-post-2

Below the image I put the year the pattern was created (look for the copyright on the envelope – most have it but a few old patterns didn’t).

scansnap-r

While I may never use the year for searching, it is nice to have for reference, and I didn’t want to add a tag for each year.  Another thing I could do since I have some really old patterns is tag with the decade, like ‘1980’s’.  Who knows, I might want to create an 80’s outfit sometime (not like I don’t have some leftover clothes from then, haha).  Another bonus of having a little bit of text in the note is that I’ll see a smaller thumbnail of the pattern when I view the entire Notebook (otherwise it is a larger thumbnail of PART of the image… the entire image doesn’t show).

TAG, TAG, TAG! 

Once the envelope is scanned, start tagging.   When in doubt, tag it.  Tag all the elements in the pattern (shirts, pants, belts, hats, bows). Tag the theme (e.g. princesses) and style (e.g. v-neck, sweetheart, etc). There is virtually no limit on the number of Evernote tags you may use.

Once you add a few tags to a pattern (around 3), you will have to add all subsequent tags through a pop-up.  It takes extra clicks and is tedious, so to alleviate some of that you can do a few things to free up some additional room on the right side of the screen:

I unchecked “Show Left Panel”.

scansnap-q


I also unchecked “Show Labels” and I removed a few icons using the “Customize Toolbar…” option  (to access this menu, right click on toolbar where tags are displayed)
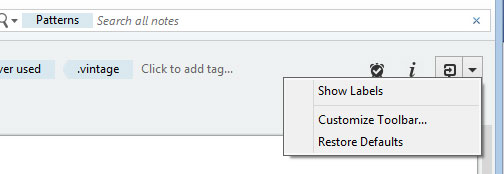
scansnap-s


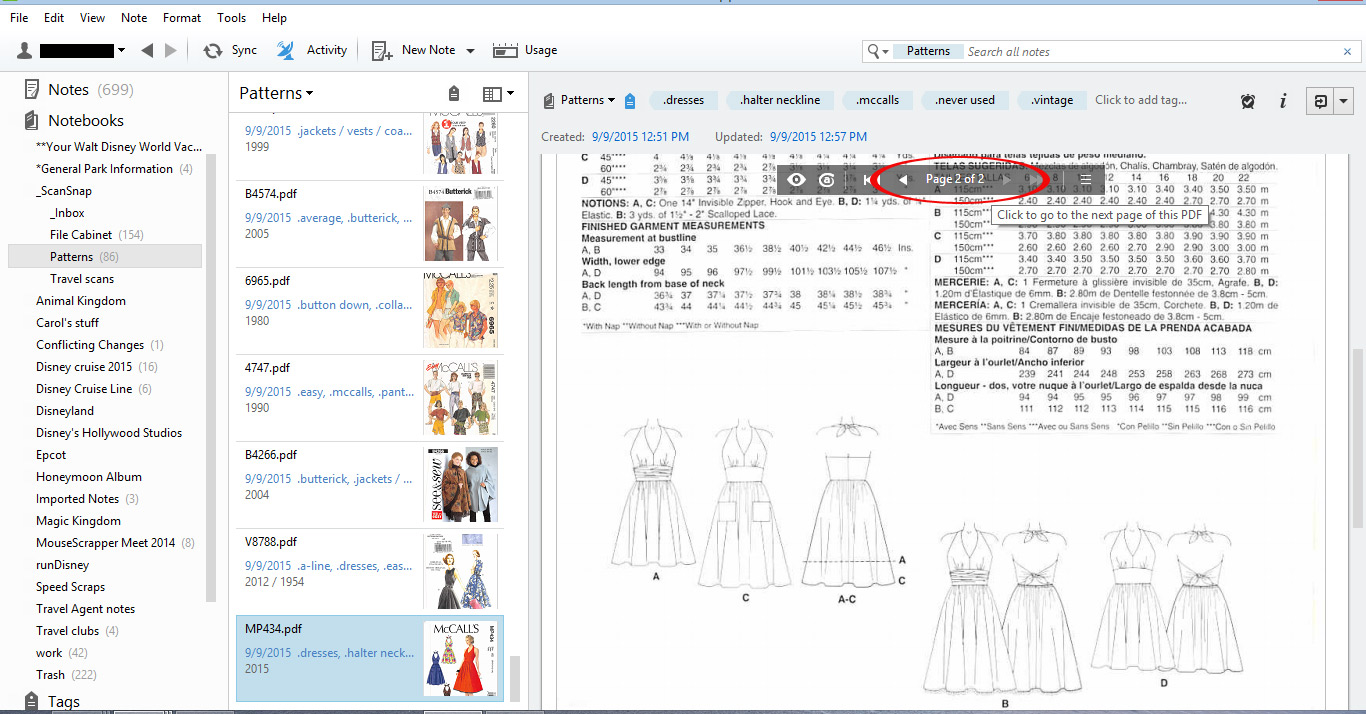
Once you are finished tagging you are done with the pattern. Here is how Evernote looks.  You can see I have tagged this McCalls pattern with ‘.dresses’, ‘.halter neckline’, ‘.mccalls’ etc.  There are a couple of ways to configure your screen for viewing purposes. I like seeing a large photo of the pattern in the right panel

scansnap-j

The only thing I don’t care for with my cataloging method is that I have to hover over the image in order to find the arrow to go to page 2 (showing the back side of the pattern).  But I wanted to keep it a pdf (jpg is another option, but the text wouldn’t be searchable), so I will live with the 2 page pdf.
scansnap-k

Scan. Rinse. Repeat 🙂

Once you’ve cataloged all your patterns, now you can search by your tags.  Click the tag icon and select the options you wish to filter on.
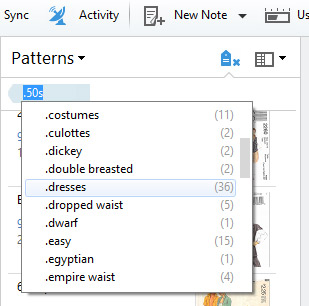
scansnap-l

Here the view is filtered on dresses, and I can see 7 dress patterns in the center column.

scansnap-n

I can also search on multiple tags.  Here I’ve filtered for strapless dresses.  This is so exciting!

scansnap-o

Here I filtered on “.sash”.  Who knew I had 4 of them??

sash

I thought I’d also try using a combination of tags and the search feature since the optical character recognition (OCR) means I can search text on the back of the pattern.  I also wondered if I could use a “-” sign to exclude certain tags, and it seemed to work!  Here I searched pants that don’t have a zipper listed on the envelope (notions).  So what if this pattern is from 1990… it might work for my next project!
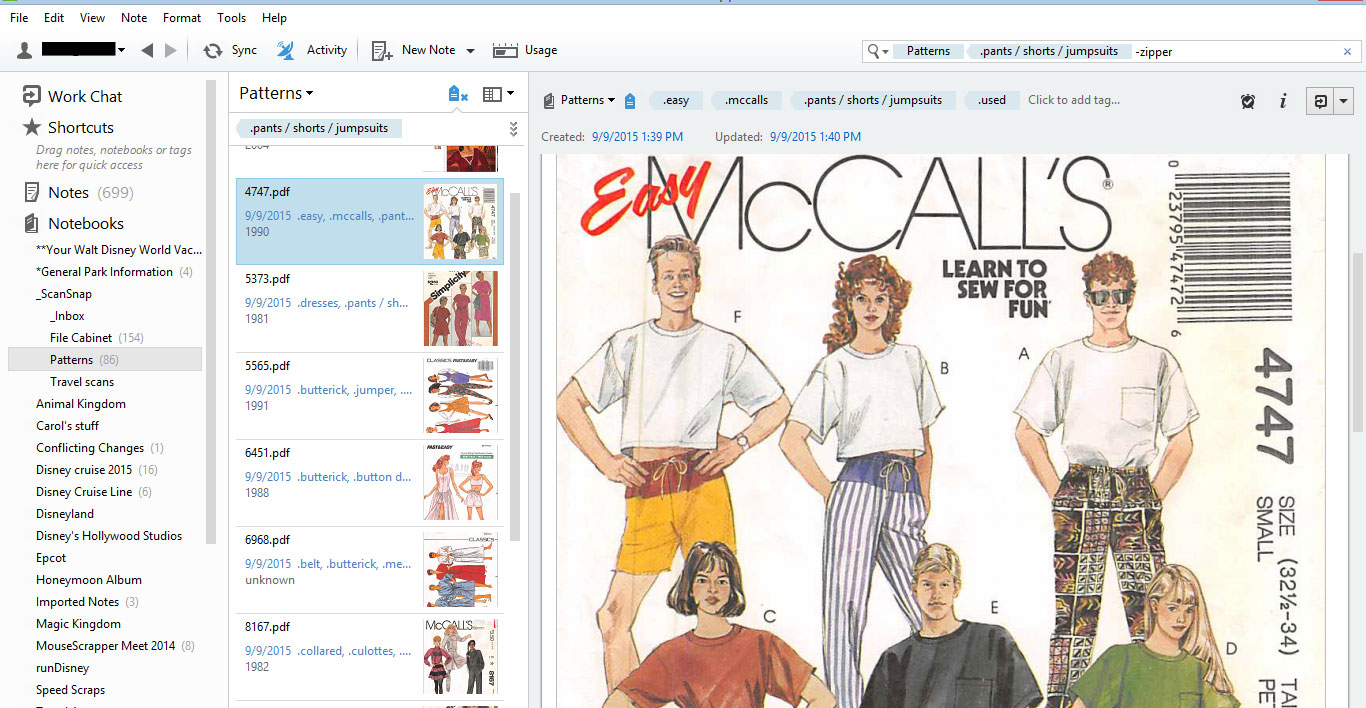
zipper

As I mentioned, you can change the view.  Here is how it would look if you hide the “Note Panel” and changed the view from “Snippet” to “Card”.  I like seeing multiple patterns at once, but it loses points for not being able to show the entire image of each.  So for now, I’ll leave it as a snippet.
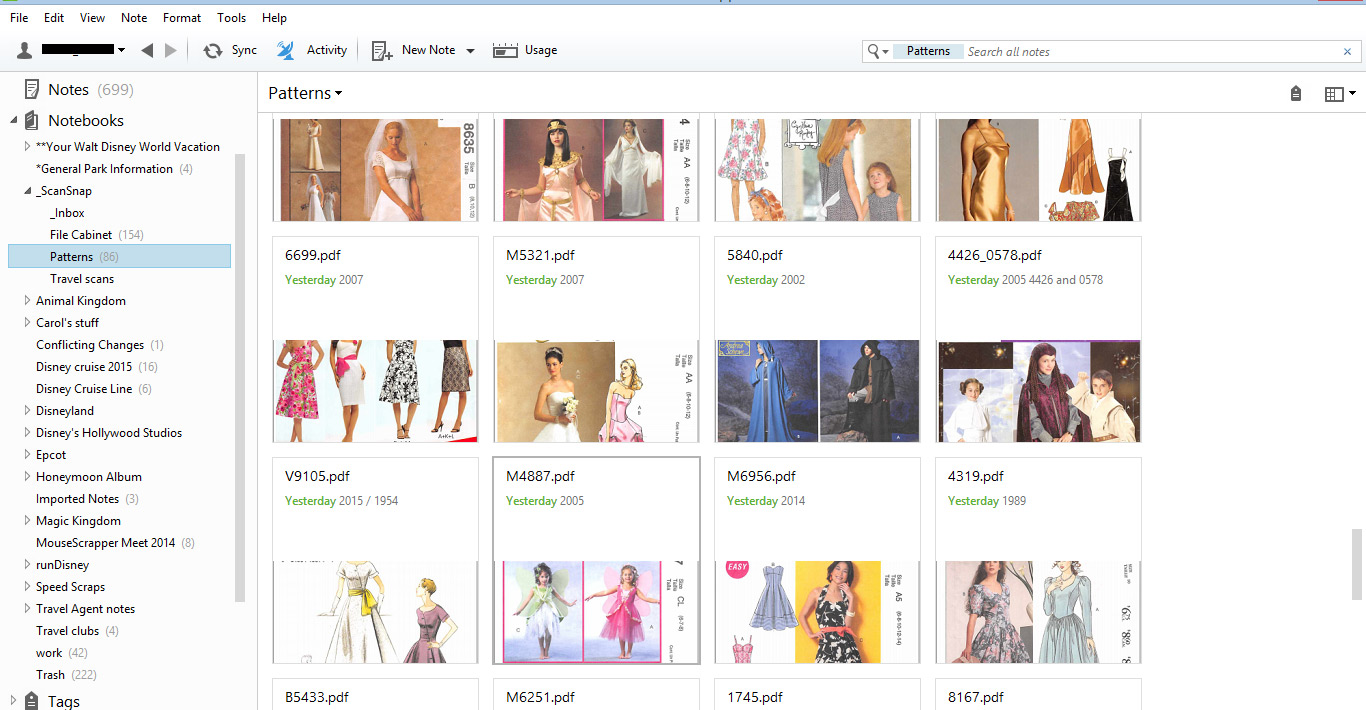
scansnap-i

When I was all finished cataloging all my patterns, I had 91 of them, which surprised even me!  It took a few hours to get organized, but going forward, all new patterns will be a snap (pun intended) to add.  So I think it was well worth the time investment.  Now next time I need a pattern for a project, I will check my stash first!

Categories
Tutorials

Photoshop Elements tutorial -Cropping a photo to fit a frame

Julie here today with a quick photoshop elements tutorial. Have you ever had an odd shaped frame that you wanted to fit your photo into, but didn’t have a clipping mask to go with it? Today I will show you how to do that without using your eraser. I am using  Natalie’s Place Designs Konichiwa 2 kit for my sample.

Open a new document, create a background and then place a frame over it.

Using the move tool drag your photo onto your document. Make sure that your photo is under your frame layer on the layers palette.

Re-size and rotate your photo as needed to fit the frame how you would like it. Check the green check mark when finished.

To delete the extra photo hanging out from behind the frame, select the frame layer, then select the magic wand tool. Click once inside the frame. You will then see marching ants going around the inside of the photo frame.

Then press CTL (CMD in the mac) + Shift +I to select everything outside of the frame (invert selection).

Then select the photo layer.

Press delete or backspace. This will erase everything outside the frame window.  Press CTL (CMD) + D to remove all selections.

Voila! Your photo is now cut into the same shape as your frame. I usually link my photo to my frame, so that if I decide to move it, the two items will stay together. Hopefully you find this tip useful!


Categories
Tutorials

Organizing Your Photos For an Album

Here at MouseScrappers there have been lots of questions and threads about how to best organize photos, supplies, and albums.   Organizing is very much a personal thing, and no one system will work for everyone.   Your best system will probably be an amalgam of ideas from others that are adapted to suit you and your scrapping style.

I do not scrap chronologically.  I scrap whatever I’m in the mood to or whatever pictures will work for a challenge.  Boredom sets in easily for me so I bounce around a lot between themes and parks.  This is the system I use to help me keep track of which pages have been done and which still need to be done, as well as giving me an overall picture of where I am in the album process. I hope you can adapt some of these ideas to help you organize!

First, my photos are divided up by location.  Each park has its own section and there are sections for our hotel and travel, other hotels, and Downtown Disney.  Each page I want to scrap has a line under the location.

So the teal color is the start of a new location.  When I have finished a page, I grey it out.

This screenshot shows the theme of the page.  The second column is if I think I may want to make it a two page spread.  The third column is how many pics I have that I want to use on that page.


This screenshot shows the 4th column.  This is where I list any kits I may have that I want to use.  Sometimes ideas come up and I forget so this is a great way to remember what I want to use even if I won’t be doing the page right away.

The last screenshot shows all of the columns.  If I listed a kit I’d like to use I mark an X if I already have it.  No X means I need to buy it.  The last column is the ‘Done’ column.  When I finish a page I mark this column with a number.  1 means it is a one pager and a 2 means it is a 2 page spread.  This column tallies for me, so at the bottom of the spreadsheet I always know how many pages I have completed in the album.


At the bottom of the spreadsheet I have a box telling me I need to do 6 -8 pages a month to finish my album by September 2013.  I have figured on about 160 pages.  I have 46 done.  Then there is a list o f kits I may want to purchase.  When I have a little scrapping supply money I can look at my list and pick one or two up.


I hope these screenshots have given you ideas on how you can better organize your own scrapping.  Please let me know if you have any questions.  In the future we will have other MouseScrappers show you their organization systems, so stay tuned for more great organization tips!

Tukogirl

Categories
Tutorials

Hybrid Tutorial – Mousekeeping Envelopes

Today I am bringing you Hybrid Tutorial to help you prepare for your next Disney trip. Every time we go to WDW,  I try to plan ahead for a few of the things I need to bring with me. One of those things is tip envelopes  pre-filled with a few dollars, for Mousekeeping (housekeeping for you non-disney folks out there). In the past I have used plain envelopes with Mousekeeping written on them, or used pre-made designs found on-line. For my last trip I decided to put my digi-scrap abilities to good use and try to make some of my own. I really had a lot of fun making them, and hopefully the Mousekeepers enjoyed them too!

The first thing I did was fired up Photoshop Elements and made a new file just a smidgen smaller than the envelopes that I intended to use. Then I just made a simple design, using Britt-ish Designs Friendly kit. Once I was finished I printed out my image on 32lb weight paper. I like using this weight paper, because its a little thicker than regular copy paper and holds the printer ink well without any bleed through.

Then I used my paper cutter to crop the printed image with no white space at the edges.

Next I took the cropped image and ran it through my Xyron to make it into a sticker.

Once through, I peeled off the clear top layer.

Then I carefully positioned it on my envelope. Take care because the image is very sticky and once you set it down it is pretty much stuck (yes I did have to re-do this once because I wasn’t being careful). Although I suppose if you used the re-positionable adhesive cartridges for the Xyron then it would be easier to move the image around if you needed to.

Then I just pressed and smoothed out the image on the envelope to make sure there were no bubbles or wrinkles and voila you have a Mousekeeping tip envelope!

Here are all of the envelopes I made for my trip. I thought it would be fun to make a different design for each day.

(credits: Used kits from Britt-ish Designs, Natalie’s Place Designs, and an Alpha from Crossbone Cuts)

Hopefully you find this hybrid tutorial fun and interesting. I would love to hear from you if you did.

Julie

Categories
Disney @ Home Travel Tips Tutorials

Mickey Medicine Kit – How To

No one wants a blister, tummy ache, headache, the sneezies, or any other medical mishap to ruin a fun day at the parks.  But no one wants to bring a five pound emergency kit in their park bag either!  Finding a balance between being prepared and bringing too much is key on a Disney vacation.  Today I’ve got a little How-To for you that I hope will help get you through any little medical emergencies at the park so you can fix your family (or yourself) up and move on to more fun!

Made using Part of your World by Honeybee’s Creative Hive

This mini medicine kit is really mini, but it isn’t meant to hold supplies to last your entire vacation.  I pack mine with one of everything I may need while I’m at the parks or on the road.  Just enough to make you feel better so  you can finish out your day or until you can make it to your room, your resort store, your car, or the drugstore.  Back at the hotel I keep a large bag with more of all of these supplies.  At the end of the day, if I have used something from my mini kit, I can refill from the larger bag and be ready for an in-park emergency the next day.

Here is what I keep in mine:

  • 2 immodium tablets
  • 6 bandaids of different sizes
  • small packet of antibiotic ointment
  • 2 Bayer aspirin
  • 6 Tylenol
  • 2 allergy/sinus tablets
  • 2 Alka seltzer cold tablets
  • several small pieces of moleskin
  • 1 gas-ex tab
  • 1 small individual vial of eye drops
  • one cough drop

I know that seems like a lot to get into an altoid tin, but with careful layering it fits perfectly.  I’ve even added a few other items in there with no problem.

Supplies you will need:

  • empty altoid tin that has been washed out to remove any residue, and then dried thoroughly
  • small scissors
  • x-acto knife (can use sharp scissors too)
  • papers or printed digital items
  • red line tape
  • 16 inches of ribbon

1.BOTTOM – Create a new document in your digital scrap program that is 4.5inches wide by 3inches tall.  Or use paper cut to that size.  Clip whatever paper you choose (I like a fun pattern) to the rectangle and print.

2.BOTTOM – Cut out the rectangle of pattern paper and lay it evenly under your altoid tin.  Trace around the bottom of the tin as close as you can get to the edge of the tin.

3.BOTTOM – cut out the altoid tin shape using the pattern you made BUT SLIGHTLY SMALLER.  I use the edge of my scissors as a guide and cut about an 1/8 of an inch inside the line I drew.

4.BOTTOM – cut small pieces of your redline tape and place them around the edges of your paper, making sure there is tape on the corners.  Peel off redline tape and stick to bottom of tin.

5.TOP – in your 4.5×3 inch document, place a fun background and add some fun decorations.  Shadow and add any details you want.  DON’T PUT THE DECORATIONS AT THE EDGES! You may have noticed your pattern is actually larger than the size of your altoid tin.  This is so you can wrap the edges of the paper around the edge of the tin.  So when placing your decorative elements, don’t put them right on the edges of your scrapping area, move them more towards the center so they show on the lid.

6.TOP – Print your lid and cut it out, removing any white paper around it.  You just want the 4.5×3 block.  Lay your tin on top of the rectangle, getting it fairly centered inside.  Trace the lid of your tin onto the rectangle. Round out the corners of your rectangle to match the corners of the lid you traced.  AROUND THE CORNERS of the rectangle make small cuts about 1/4inch apart from the edge of the paper just to the traced line.

7. TOP – place redline tape around the INSIDE of the line you traced.

8.TOP – wrap redline tape around the sides of the top of the tin, paying attention to the corners.  Then wrap redline tape around the sides of the bottom of the tin, spaced evenly between the bottom edge of the lid and the bottom of the tin.

9.TOP – peel off the tape strips on the paper and stick the decorative paper to the top of your tin. You will have edges hanging over.  Peel off the tap strips on the sides of the lid.  Starting at the corners, stick down the flaps you created when you cut the edges of the papers.  Once all four corners are stuck down, stick down the sides of the tin.

10. TOP – Once the top and all edges have been stuck down, take an xacto or sharp small scissors and trim the edges, using the rolled edge of the tin top as a guide.

11. SIDE – peel off the redline tape from the bottom sides of your tin.  Find the center of your ribbon and place it at the center back of the tin.  Wrap the ribbon around the tin, placing it on the tape evenly between the top and bottom.  When you meet in the center front, tie a double knot in the ribbon and trim any excess ribbon.

You are done!  Here is a shot of the finished product again.

After our vacation, I use the decorated tin in my purse until it starts to fall apart.  But usually it can be rattling around in there for months and still look pretty good.   The Alice tin below is one I made for our September trip.  It’s been in my purse since then and it’s starting to look a little worn.  On this one I wrapped ribbon around the top and bottom edge, but I think I like wrapping the top edge with paper better.

This is a tin I did for our first trip in 2009, which was a mix of digital and hybrid.

I hope this post will help you be prepared for any emergency in the parks, or even an emergency out in the ‘real world’ and that seeing your cute tin decorated with something that reminds you of Disney will make you smile!