 11-07-2010, 04:50 PM
|
#1 | |||
|
Sliding back and forth on Mickey's Fun Wheel

Join Date: Jan 2010
Posts: 785
|
Template Challenge 37 (11/6 - 11/19)
Sorry this is a bit late! I've been doing DSD stuff.
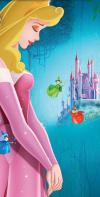
I hope you've got a bunch of new kits you're ready to scrap with from the DSD sales!!!! It's my turn again to host the template challenge. This time I wanted to do a template that could be used many different ways  When I used to paper scrap, I remember cutting photos out of letters so I wanted to create a template that you could use in that way... or other ways too. When I used to paper scrap, I remember cutting photos out of letters so I wanted to create a template that you could use in that way... or other ways too.Here's my page I made for an example using the template. It's a cover page for our 2008 - 2009 Disney album featuring favorite pics of my boy that year.  This is a great template for cover pages, or for Disney characters, Disney treats, Disney souvenirs, etc. Be creative! You can also fill the letters with patterned or colored papers instead of photos. Here's the template! Hope you like it and can use it  Download direct on my blog here or {link expired} Instuctions for Filling the Letters aka Clipping Masks: The easiest way to use this kind of template is to place the photo or paper you want to take place of the letter (or whatever) - let's say the "D" - on top of the D in the layers list. Then hit CTRL-G for PSE or CTRL-ALT-G for PSCS to create a clipping mask. You can also use that to change the color of the Starburst background. And if you make a page using the template, post in the gallery, here in the challenge thread and in the forums, and leave love for all the others, I have a little something for you.... some Disney Doodles made by me.  Remember the rules: - Please upload your layout to the Gallery in the "Template Challenge" category. Post a linked image here so we can leave love and in the relevant forum. Leave love for others. Hugs Denise aka A Grieving Mommy PS - Here are the ways to change the color of the starburst background. There are a couple of ways to do it. Try these. One way is to use the overlay/blend modes. This is the easiest way. First bring the paper you want to use into the template and place it just above the starburst layer. (So that it's directly on top in the layer list but not masked which is using the CTRL G method.) Then click on the paper and go to your overlay/blend modes. The overlay/blend modes are located in the same area as the layers list but at the top above the little icon of the garbage can. You should see the word "Normal" with a little triangle/arrow next to it. Click on that triangle/arrow and you can try out the different blending modes. The starburst paper works well with a lot of the different modes especially Darken, Screen, Linear Burn. Try out all of them and pick one you like! Here's another method that is a bit harder. First select the sunburst layer. Then using your magic wand selection tool, click on any part of the black part of the sunburst paper. Now all of the black should be selected. Next choose "New Layer via cut". This will separate your black and white part of the sunburst and allow you to clip a paper to each of the parts of the starburst. Take the paper you choose to be the black portion of the sunburst and put it on top of that black portion in the layers list. Then hit CTRL G or ALT CTRL G to clip them together. Do the same thing with the white part of the sunburst paper. Hope this makes sense
__________________
- denise A Grieving Mommy "Life is about Love and Scrappin' is my documentation of that Love." ***My Blog*** Last edited by Carolc; 09-22-2013 at 06:03 PM. 
|
|||

|
||||
| Sponsored Links |
|
11-07-2010, 05:46 PM
|
#2 | |||
|
E Ticket Holder
 
Join Date: Apr 2010
Location: 187 Miles North of Disneyland
Software: Phtoshop CS 4
Camera: Nikon D40
Posts: 3,049
|
Such an awesome Challenge Denise! I have to host next week and you will definitely be a hard act to follow!
|
|||
|
|
||||
|
11-07-2010, 05:50 PM
|
#3 | |||
|
E Ticket Holder

Join Date: Oct 2009
Location: Alabama
Software: Photoshop
Camera: Nikon D300s
Posts: 4,276
|
GREAT TEMPLATE!!! Love it. Great PP!
__________________
 DVC Member 2008! Annual Passholder I'm a Disney fan who loves inspiring and helping others experience the magic of Disney ---ETSY Seller
|
|||
|
|
||||
|
11-07-2010, 06:03 PM
|
#4 | |||
|
E Ticket Holder
 
Join Date: Mar 2010
Location: Minnesota
Software: PSE 10
Camera: Canon 60D
Posts: 8,965
|
Wow, Denise! That is so fabulous! I will be downloading soon and working on my LO!!!
Thanks for the awesomeness!
__________________

|
|||
|
|
||||
|
11-07-2010, 06:07 PM
|
#5 | |||
|
E Ticket Holder
 
Join Date: Jun 2010
Location: Hockessin, DE
Software: PSE10
Camera: Nikon D40
Posts: 3,593
|
Awesome template...I love it...Thanks for hosting and a great PP too...
__________________
|
|||
|
|
||||
|
11-07-2010, 06:12 PM
|
#6 | |||
|
Fascinated by the World of Color

Join Date: Jun 2010
Location: Texas
Software: GIMP
Camera: Nikon and a Sony
Posts: 800
|
WOW I really like this one!! Now to find just the right pictures to use!!!
__________________
      Carmen Carmen
|
|||
|
|
||||
|
11-07-2010, 06:37 PM
|
#7 | |||
|
Moderator
 
Join Date: Jan 2010
Location: Southern California
Posts: 10,453
|
soo cool! What a great template idea! Can't wait to see what everyone creates!
__________________
Andrea 
|
|||
|
|
||||
|
11-07-2010, 07:10 PM
|
#8 | |||
|
E Ticket Holder
Join Date: Sep 2009
Location: 1,103 Miles from MK
Software: CS6~PSE10~SBC
Camera: Nikon D3300
Posts: 7,119
|
Awesome Denise, we are getting lots of goodies here, Thank you!
love them!!!   
__________________

|
|||
|
|
||||
|
11-07-2010, 07:12 PM
|
#9 | |||
|
Staying the night at Animal Kingdom Lodge
Join Date: Mar 2010
Location: Pittsburgh, Pennsylvania
Software: Photoshop CC 2017 and Photoshop CS2
Camera: GE X500, Sony CyberShot
Posts: 2,968
|
Denise ... this template is awesome !!! I can't wait to work with it !!! Thanks so much for hosting.
|
|||
|
|
||||
 |
|
|
 Sponsored links
|
|


 Linear Mode

